All Posts(11)

Page 2 of 3
Cool Pic

Deploying your Astro blog

Keep your Astro source private and publish only the static build

GitHub Pages for private respositories is not supported on GitHub Free (read here) and I didn’t like the idea of making the whole blog’s source code and post drafts publicly available. So I had to come up with a solution.

NOTE

I’m aware that Cloudfare Pages it’s free, faster than GitHub Pages, and supports private repos. But I also had the comments section tied to the public repo so. Maybe next time…

The idea is simply using a two-repository strategy:

  1. Private repo - Where we keep our source code with drafts, work-in-progress posts, and all our Astro source files.
  2. Public repo - Just the contents of the dist/ folder, for GitHub Pages deployment.

Configuring the Deployment Target

By deployment target, I mean the public repo from where we will will serve the site to the world, using GitHub Pages.

NOTE

Remember, our private repo is where we write posts, keep drafts, and build the Astro project. The public repo is just where we push the final static output.

In our public repo, we have to configure a publishing source for GitHub Pages. There are a couple of options here:

  • To publish when changes are pushed to a specific branch.
  • Or you can write a GitHub Actions workflow to publish your site.

We’ll be using the first option; just click on the Settings tab of your repo, and once there, find the Pages slot in the left sidebar. Mine looked like this:

the branch method

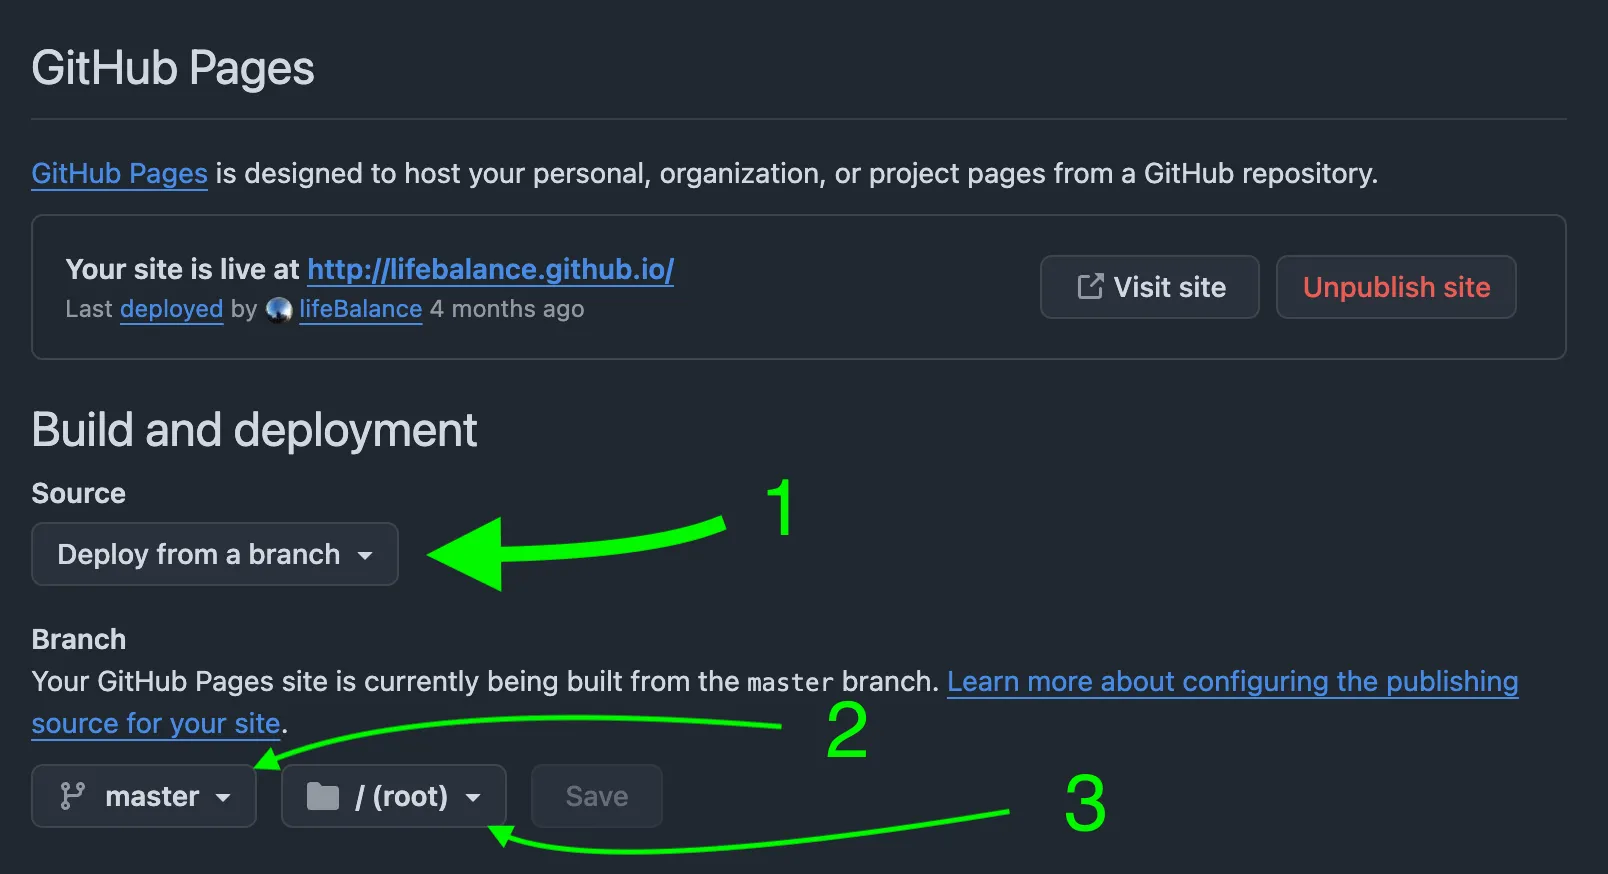
What this means is that whenever we push changes to the master branch (root folder /), our GitHub pages will be published.

For Astro Users

Before building our site, we need to tell Astro the final public URL where our site will be published. This is controlled by two settings in astro.config.ts:

  • site is the domain where we will serve the site.
  • base is the path under that domain where your site will live.

Since we will be serving the page from the URL of the public repo, we need to add it to our astro.config.ts:

export default defineConfig({
site: 'https://<username>.github.io',
base: '/',
// more stuff...
})

If your public repo is the special GitHub Pages repo named <username>.github.io, then the site is served from the root: https://<username>.github.io/.

TIP

In my case, since it was my personal page, I used the https://<username>.github.io URL. But it doesn’t have to be, any public repo URL will do, e.g. https://github.com/<username>/<repo-name>.

But if you’re publishing to a repo named foo, then you should use something like:

  • site: 'https://github.com'
  • base: 'foo'

TLDR

Just three steps:

  1. Build your project; from the private repo run:
Terminal window
npm run build
  1. Copy the contents of the dist folder, from the private repo to the public repo:
Terminal window
rsync -a --delete --exclude '.git' dist/ ../my-blog-public/
  1. Move to the public repo, and push changes:
Terminal window
cd ../my-blog-public
git add -A
git commit -m 'new build'
git push

1. Creating the Build

Not much to say here, whenever you add a new post, and are ready to publish, you need to build right? Let’s assume you have the following build script in the package.json of your private repo:

"build": "astro build"

We just have to change to the root of your private repo, and run:

Terminal window
npm run build

In the case of an Astro project, we should end up with a dist folder containing the artifacts of our build.

2. Copy the Build to the Public Repo

Now the goal is to move the contents of the dist folder (not the folder itself, but its contents), to the root of our public repo. :

Terminal window
rsync -a --delete --exclude '.git' dist/ ../my-blog-public/

Let’s go over the flags:

  • dist/ with trailing slash copies the contents of dist, not the folder itself.
  • --delete removes stale files from the public repo.
  • --exclude '.git' preserves the public repo Git metadata.
  • It copies hidden files like .nojekyll.

TIP

In Astro, dist is the default build folder; but if you’re using another one, or not even using Astro, feel free to use whatever folder you need to.

The command above assumes that you have cloned your public repo to the parent folder of the private repo. Check the following folder structure:

Terminal window
parent-folder/
├── my-private-repo/ # 👈 We're working here.
├── src/
├── content/
└── dist/
└── my-blog-public/ # 👈 Make sure you have cloned your public repo.
└── .git/

3. Pushing Changes to the Public Repo

Push the changes to your GitHub public remote:

Terminal window
cd ../my-blog-public
git add -A # Stage the changes
git commit -m "New build" # Commit
git push # Push

That should be enough you have your page live after a few seconds.

GitHub Actions

Ok, now that we’re familiar with the steps to publish our site manually, let’s see how we can do the same with a GitHub Actions workflow.

NOTE

Remember, the idea is quite simple: keep the repo with the source code and posts private, and push the build to a public one.

In the private repo, if I go to Settings > Pages, I’ll see a warning:

no GH Pages

That’s the root of the problem: with a free account, I can’t have GitHub Pages in a private repo.

Creating a PAT

Before start writing the action, we need to create a GitHub Personal Access Token tied to the user that has push access to the public repo (myself).

In order to do that we have to click on our user logo (upper right corner), and once the sidebar opens up, click on Settings → Developer Settings → Personal access tokens. I selected Tokens (classic), then Generate new token, and Generate new token (classic).

NOTE

Make sure you do not over-scope the token. For your use, just public_repo is enough to gives the token access to public repositories, which is enough for your workflow to push the built dist/ files to.

Give it a descriptive description (under Note); I named mine Deploy code-blue to lifeBalance.github.io. Once the token has been generated, you are redirected to a new page; you should copy the token name GH_PAGES_TOKEN.

WARNING

Make sure to copy your token now as you will not be able to see it again.

If for some reason you didn’t copy the token, just regenerate it again, no big deal.

Using the PAT

Now we need to add the PAT as a secret (e.g., GH_PAGES_TOKEN) in the private repo:

  1. In our private repo, we go to Settings → Secrets and variables → Actions
  2. Click New repository secret.
  3. Name it GH_PAGES_TOKEN (or whatever you name it in the *.yml file).
  4. Paste your copied PAT.

That’s it — now your GitHub Actions workflow will automatically have access to it through ${{ secrets.GH_PAGES_TOKEN }} — no manual shell exports needed ever again.

The Workflow

Create a .github/workflows/deploy.yml in the private repo:

name: Deploy to GitHub Pages
on:
push:
branches: [main]
workflow_dispatch: # Manual trigger for actions
jobs:
deploy:
runs-on: ubuntu-latest
steps:
- uses: actions/checkout@v3
- name: Install dependencies
run: npm ci
- name: Build site
run: npm run build
- name: Add .nojekyll file
run: echo > dist/.nojekyll # Ensures GitHub Pages ignores Jekyll processing
- name: Deploy to GitHub Pages
env:
GH_PAGES_TOKEN: ${{ secrets.GH_PAGES_TOKEN }}
run: |
TEMP_DIR=$(mktemp -d)
cp -r dist/. "$TEMP_DIR"
cd "$TEMP_DIR"
git init
git config user.name "GitHub Actions"
git config user.email "actions@github.com"
git remote add origin https://$GH_PAGES_TOKEN@github.com/lifeBalance/lifeBalance.github.io.git
git checkout -b master # Use 'master' instead of 'main' for GitHub Pages default branch
git add .
git commit -m "Automated deploy"
git push -f origin master # Push to master branch

Switching Workflows

If your GitHub Pro subscription expires and you can no longer publish GitHub Pages from a private repo, you do not need to delete your old GitHub Pages workflow. In my case, I kept .github/workflows/astro.yml around and disabled it.

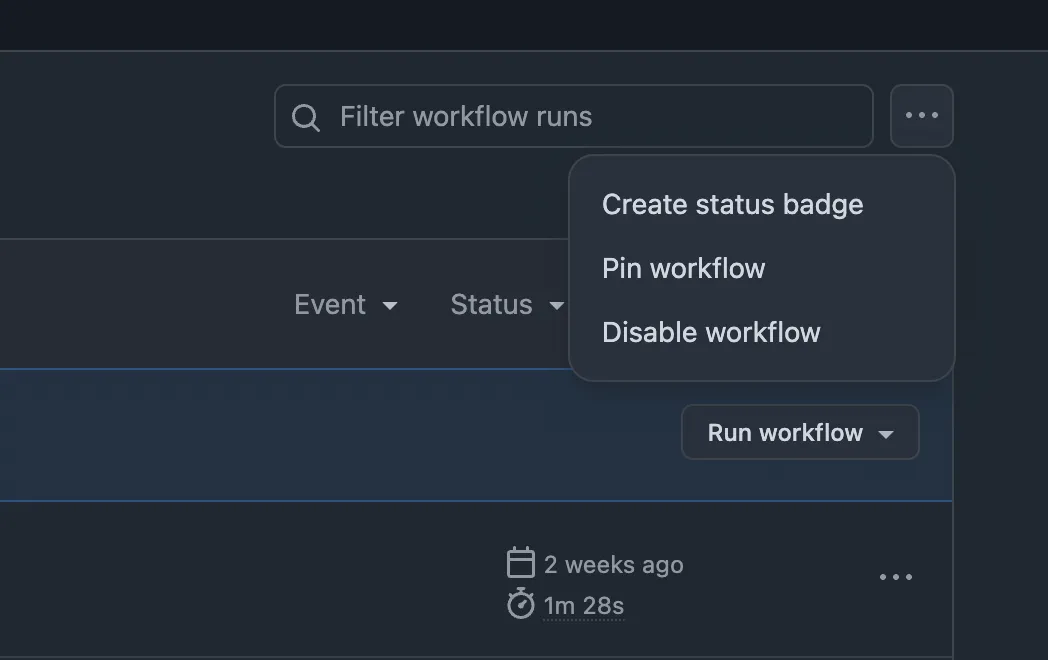
  1. Go to the Actions tab.
  2. Find the Deploy Astro site to Pages workflow. That is the workflow name from astro.yml.
  3. Open any previous run of that workflow.
  4. Click the ••• menu in the top-right corner.
  5. Click Disable workflow.

Disable workflow

IMPORTANT

This only disables astro.yml. It does not affect deploy.yml. The file stays in the repo, but GitHub will not run it unless you enable it again.

If you later re-enable GitHub Pro and want to deploy directly from the private repo again:

  1. Disable deploy.yml, the workflow that pushes the build to the public repo.
  2. Re-enable astro.yml.
  3. In the private repo, configure GitHub Pages to use GitHub Actions as the source.
Cool pic

Web Dev CLI Setup for macOS 💻 🍎

First things I do to start burning oil as a Web Dev

It’s not so often we get to set up a mac with the basic command line tools that make you productive, here I’ll leave what I do.

Command Line Tools

If you’re gonna be writing apps for iOS or macOS, most probably you should be installing Xcode, but if that’s not the case, probably it’s enough to install the command line tools:

Terminal window
xcode-select –-install

NOTE

Trying to run an unknown command such as git, will also cause the system to prompt us to install the command line tools.

To verify that the command line tools have been installed, you can run:

Terminal window
xcode-select -p

The output of the command above should be the location of the **command line tools in our system, in my case /Library/Developer/CommandLineTools. If you’re curious about what tools exactly are we getting, run:

Terminal window
ls Library/Developer/CommandLineTools/usr/bin

Homebrew: the macOS Package Manager

Homebrew is the most popular package manager for macOS, which we can install with:

Terminal window
/bin/bash -c "$(curl -fsSL https://raw.githubusercontent.com/Homebrew/install/HEAD/install.sh)"

Oh My Zsh

Oh My Zsh is an open source, community-driven framework for managing your Zsh configuration. Installing it is super easy:

Terminal window
sh -c "$(curl -fsSL https://raw.githubusercontent.com/ohmyzsh/ohmyzsh/master/tools/install.sh)"

If you restart your shell, you’ll see you have a pretty cool new prompt. Next, let’s install some plugins:

  • Autosuggestions plugin, which suggests commands as you type based on history and completions. Read installation instructions here
  • zsh-syntax-highlighting plugin, which enables highlighting of commands whilst they are typed at a zsh prompt into an interactive terminal. This is super helpful for catching typos that would result in syntax errors. Read how to install it in oh my zsh here
  • zsh-autocomplete plugin, which provides real-time type-ahead autocompletion to your command line. This one doesn’t include instructions about how to install in oh my zsh. Basically we just have to clone it in the plugins folder:
Terminal window
git clone --depth 1 -- https://github.com/marlonrichert/zsh-autocomplete.git $ZSH_CUSTOM/plugins/zsh-autocomplete

NOTE

Note how above we’re using the ZSH_CUSTOM environment variable, which is used in Oh My Zsh to specify a custom directory for your plugins, themes, and custom configurations.

Once we’ve installed the plugins we want, we have to add them to the list of plugins in a our .zshrc file; this is what my list looks like:

Terminal window
plugins=(
git
zsh-autosuggestions
zsh-syntax-highlighting
zsh-autocomplete
)

To uninstall any of the plugins, we just have to remove it from the list of plugins above, and remove its folder; for example, to remove the zsh-syntax-highlighting folder:

Terminal window
rm -rf $ZSH_CUSTOM/plugins/zsh-syntax-highlighting

FZF

Fzf is a command-line fuzzy finder which I find super useful. Let’s install it with brew:

Terminal window
brew install fzf

Here I had some problems integrating this tool with zsh, but searching through the internets I found out that we have to run an installation script to generate the necessary configuration files:

Terminal window
$(brew --prefix)/opt/fzf/install

NOTE

The $(brew --prefix) part is a command substitution that gives us the folder where Homebrew installs all the stuff; so if you run brew --prefix the output in my case, at the time of writing this, was /opt/homebrew (back in the day it was some other folder).

The output of the command above:

Terminal window
Downloading bin/fzf ...
- Already exists
- Checking fzf executable ... 0.61.3
Do you want to enable fuzzy auto-completion? ([y]/n)
Do you want to enable key bindings? ([y]/n)
Generate /Users/javi/.fzf.bash ... OK
Generate /Users/javi/.fzf.zsh ... OK
Do you want to update your shell configuration files? ([y]/n)
Update /Users/javi/.bashrc:
- [ -f ~/.fzf.bash ] && source ~/.fzf.bash
+ Added
Update /Users/javi/.zshrc:
- [ -f ~/.fzf.zsh ] && source ~/.fzf.zsh
+ Added
Finished. Restart your shell or reload config file.
source ~/.bashrc # bash (.bashrc should be loaded from .bash_profile)
source /Users/javi/.zshrc # zsh
Use uninstall script to remove fzf.

At the end, we should end up with a line at the end of our .zshrc:

Terminal window
[ -f ~/.fzf.zsh ] && source ~/.fzf.zsh

Which checks that the generated ~/.fzf.zsh file exists, and source it.

Amazon Q

A friend of mine recommended me a (generative AI)-powered assistant named Amazon Q, which is quite easy to install in macOS:

Terminal window
brew install amazon-q

Or just download the .dmg file, and clickety-click until we have it running. Whatever way we choose, we can verify the installation with:

Terminal window
q --version

NVM

nvm is next:

Terminal window
curl -o- https://raw.githubusercontent.com/nvm-sh/nvm/v0.40.2/install.sh | bash

Running the command above appends the following lines to the bottom of our .zshrc:

Terminal window
export NVM_DIR="$HOME/.nvm"
[ -s "$NVM_DIR/nvm.sh" ] && \. "$NVM_DIR/nvm.sh" # This loads nvm
[ -s "$NVM_DIR/bash_completion" ] && \. "$NVM_DIR/bash_completion" # This loads nvm bash_completion

To verify the installation we have to run:

Terminal window
command -v nvm

which should output nvm if the installation was successful. Please note that which nvm will not work, since nvm is a sourced shell function, not an executable binary.

NOTE

To download, compile, and install the latest release of Node.js, do this:

Terminal window
nvm install node # "node" is an alias for the latest version
The Ethertales

Functional programming in TypeScript

Part 2 - Currying

In mathematics and computer science currying is the technique of translating a function that takes multiple arguments into a sequence of families of functions, each taking a single argument.

The Pipe Analogy

One constraint of FP is that functions should only receive one input, which are technically known as unary functions. We can think of a function as a pipe that takes in one input and produces one output. This is similar to how a water pipe takes in water and produces a flow of water out the other end.

Pipe analogy

But what if we need to write a function that takes in multiple input values? We could pass all of the inputs as properties of a single object and call it a day. For example:

const greet = ({name: string, greeting: string}) => {
return `${greeting}, ${name}!`;
};
greet({name: 'John', greeting: 'Good morning'}); // => Good morning, John!

This is a perfectly valid approach, but it does introduce some potential issues that can make functions less predictable and harder to optimize in a purely functional paradigm:

  • We introduce potential mutation risks if the object is modified elsewhere in the program.
  • We’re requiring the caller to know the exact property names. If the function expects { name: string, greeting: string } but receives { name: 'Alice' }, it could break at runtime.

Curried Functions: Building a Pipeline

The FP approach to deal with this is to create an outer function that receives a single input, wrapping an inner function (also unary). For example, let’s rewrite the previous example in a curried way:

function greet(greeting: string) {
return function(name: string) {
return `${greeting}, ${name}!`
}
}
const result = greet('Hello')('Bob')
console.log(result) // => Hello, Bob!

Note that greet is a function that returns another function. The first function takes in a single input, greeting, and returns another function that takes in a single input, name. The inner function then produces the final output. For example:

console.log(greet('Hello'))

We’re calling the only the outer function greet, this is the output:

function (name) {
return `${greeting}, ${name}!`;
}

Where’s the pipeline?

Let’s rewrite the previous example in a more functional style:

const greet = (greeting: string) => (name: string) => `${greeting}, ${name}!`;

Using arrow functions this resembles a series of pipes that take in one of the inputs and pass the output to the next pipe, creating a sort of pipeline.

Pipeline analogy

This is similar to how a water pipe can be connected to multiple other pipes, each taking in one input and producing one output. Let’s create another simple example:

type Sum = (a: number) => (b: number) => number;
const sum: Sum = (a) => (b) => a + b;
const result = sum(1)(2);
console.log(result); // => 3

You may be wondering, how this is useful? Well, imagine we want to write a function that increments a number by a certain value. We could write a function reusing our sum function:

type Increment = (value: number) => number;
const increment: Increment = (value: number) => sum(value)(1);
const result = increment(5);
console.log(result); // => 6

What about decrementing?

type Decrement = (value: number) => number;
const decrement: Decrement = (value: number) => sum(value)(-1);
const result = decrement(5);
console.log(result); // => 4

Currying Functions

Now imagine that we have a function that takes in multiple inputs, and we want to curry it so we can use it as a curried function:

// Just an usual binary function
const normalSum = (a: number, b: number) => a + b
type Curry2 = (f: (a: number, b: number) => number)
=> (a: number)
=> (b: number)
=> number
const curry2: Curry2 = f => a => b => f(a, b)
const curriedSum = curry2(normalSum)
const partialResult = curriedSum(1)
console.log(partialResult) // b => f(a, b)
const finalResult = partialResult(41)
console.log(finalResult) // 42

In the code above:

  • normalSum is a normal function that takes in two inputs.
  • curry2 is a function that takes in a function f and returns a curried version of it.
  • curriedSum is the curried version of normalSum.
  • partialResult is the result of calling curriedSum with the first input, which returns a function that takes in the second input.
  • finalResult is the result of calling partialResult with the second input, which produces the final output.

So what’s the point of currying?

  1. It allows us to create partial functions that can be reused in different contexts ().
  2. It allows us to write multi-argument functions, which is easier to reason, then turn them into their curried versions.
  3. We can use the partial functions to create other versions of the same function, like increment and decrement in the previous example.
  4. Some libraries that include multi-argument functions can be curried, and the resulting functions can be used in a more functional way.

Developers often write regular functions first and curry them later if needed. Many libraries, like Lodash, provide a _.curry function so you don’t have to manually curry everything.

A Generic Curry Function

Let’s rewrite curry2 as a generic curry function that can curry any function, regardless of the type of their arguments. Here’s an example:

type Curry2 = <T, U, V>(f: (a: A, b: B) => C)
=> (a: A)
=> (b: B)
=> C

This is a generic function that takes in a function f that takes in two arguments of type A and B, and returns a value of type C. The curried version of the function takes in the first argument of type A, and returns a function that takes in the second argument of type B, and returns a value of type C. Let’s see how this works in practice:

const normalSum = (a: number, b: number) => a + b
type Curry2 = <TA, B, C>(f: (a: A, b: B) => C)
=> (a: A)
=> (b: B)
=> C
const curry2: Curry2 = f => a => b => f(a, b)
const curriedSum = curry2(normalSum)
const partialResult = curriedSum(1)
console.log(partialResult) // b => f(a, b)
const finalResult = partialResult(41)
console.log(finalResult) // 42

This works exactly the same as before, but now we can use it with any function that takes in two arguments of any type. For example:

const normalConcat = (a: string, b: string) => a + b
const curriedConcat = curry2(normalConcat)
const partialResult = curriedConcat('Hello')
console.log(partialResult) // b => f(a, b)
const finalResult = partialResult('World')
console.log(finalResult) // HelloWorld
BakaArts

Functional programming in TypeScript

Part 1 - Introduction and Function Composition

Functional programming is a programming paradigm, which allows us to write our programs in a declarative and composable way by combining functions.

Functional programming in TypeScript?

Functional programming is language agnostic, meaning that we can apply it using almost any language. The only requirement is that the language treats functions as first-class citizens, which means that we can:

  • Assign functions to variables.
  • Pass functions as arguments to other functions.
  • Use functions as return values from other functions.

All of the above is doable in TypeScript, which makes it a suitable choice to write code in the FP paradigm.

NOTE

Pure functional programming is a somehow more strict paradigm, and the exact difference between pure and impure functional programming is a matter of controversy. In fact, the earliest programming languages cited as being functional, IPL and Lisp, are both impure functional languages. Some examples of pure functional languages are Haskell and PureScript.

There are several libraries such as ramda or fp-ts, that include features to allow us to write in a more pure functional style. In this series of articles, we won’t be using any of these, just vanilla TS.

But what is Functional Programming about?

FP is about taking some input, and process it by using a chain of transformations (each transformations is accomplished by a function). When each of these functions is called with some given arguments, it will always return the same result (pure function).

In constrast, an impure function, like the ones we use in imperative programming, can have side effects (such as modifying the program’s state or taking input from a user). Side effects are considered undesirable in pure functional programming because they make functions less predictable and harder to test.

NOTE

But at some point, our application will have to interact with the outside world (get user input), how does FP deal with that? FP relegates dealing with side effects to a thin layer outside our application.

Some defining features of FP are:

  • Functions are at the center of the paradigm. We end up with a bunch of reusable units of code, which leads to having to write less code to achive the same results.
  • These functions are quite deterministic, meaning, given a given input, they always return the same output, regardless of the program’s state.
  • Easy to test code: As a result, when writing tests for the functions, we don’t have to worry about program’s state.
  • Easier to debug: FP aims to minimize or isolate side effects to make code more predictable, testable, and easier to debug.
  • We’ll see that for or while loops are not used in FP; in these scenarios we use recursion.

As with any other approach, it will take time to become comfortable using it. As a result, noticing its benefits will take some time.

Pure Functions

A pure function has the following characteristics:

  • It’s deterministic, meaning that given the same input (given in the arguments), the function always returns the same output. That implies that the function shouldn’t be affected by the state of the program (no side causes), only by its input.
  • A pure function has no side effects, meaning that calling such a function should not mutate the state of the program.
Pipe analogy

In FP, we don’t use variables only constants. Each transformation (function call) returns a new value, which is assigned to a constant. This constant can be used as input (argument) in the next transformation.

Total vs Partial Functions

A total function is a function that is defined for all possible inputs in its domain. This means that for every input value in the domain, the function will produce a valid output. For example:

function add(a: number, b: number): number {
return a + b
}

A partial function is a function that is defined for only a subset of inputs in its domain. For some inputs, the function may not produce a valid output or may result in an error. For example:

function divide(a: number, b: number): number {
if (b === 0) {
throw new Error('Division by zero is not allowed')
}
return a / b
}

So the main difference is that total functions map all of its inputs to some output value, whereas partial functions map only a subset of its inputs to some output:

Total vs partial functions

IMPORTANT

Deterministic also means that a given input value can be mapped to one and only one output value. If an input value could result in one of several output values, that’s not very deterministic, ain’t it?

Key Differences Between Total and Partial Functions

AspectTotal FunctionPartial Function
DefinitionDefined for all inputs in its domain.Defined for only a subset of inputs.
BehaviorAlways produces a valid output.May fail or throw errors for some inputs.
Input ValidationNo input validation is needed.Input validation is often required.

Why Total Functions Are Preferred in Functional Programming

  1. Predictability: Total functions are easier to reason about because they are guaranteed to work for all inputs.

  2. No Runtime Errors: Total functions eliminate the risk of runtime errors caused by invalid inputs.

  3. Composability: Total functions can be composed more easily because they always produce valid outputs, which can be passed as inputs to other functions.

  4. Immutability: Total functions align with the principles of functional programming, where functions are deterministic and side-effect-free.

How to Handle Partial Functions in FP

In functional programming, partial functions are often avoided or handled explicitly using techniques like:

  1. Option Types (e.g., Maybe or Option): Wrap the result in a type that explicitly represents the possibility of failure. For example:
function safeDivide(a: number, b: number): number | null {
return b === 0 ? null : a / b
}
  1. Validation: Validate inputs before calling the function to ensure they are within the valid subset.
function divide(a: number, b: number): number {
if (b === 0) {
throw new Error('Division by zero is not allowed')
}
return a / b
}

Function Composition

Most of what we do in FP is composing functions, which consists in combining two or more functions to produce a new function; The output of one function becomes the input of the next one. Function composition allows us to build complex operations by combining smaller, reusable functions.

For example, imagine we have the function increment:

type Increment = (x: number) => number
const increment = (x: number): number => x + 1

And also the function stringify:

type Stringify = (x: number) => string
const stringify: Stringify = (x) => x.toString()

Using function composition we can define a higher-order function named incrementAndStringify, where we connect the output tof increment to the input of stringify:

type IncrementAndStringify = (x: number) => string
const incrementAndStringify: IncrementAndStringify = (x) => stringify(increment(x))
const result: string = incrementAndStringify(1)
console.log(result) // "2"

NOTE

Function composition is closely related to the property of referential transparency. A piece of code is referentially transparent if you can replace a function call with its result without changing the behavior of the program. For example:

const stringify = (x: number): string => x.toString()
const add = (a: number, b: number): number => a + b
const result = stringify(add(2, 3))
const result2 = stringify(5) // We can replace add(2, 3) with 5

A Step Up

In the previous section, we were composing functions by hardcoding their names into the composed version. It would be nicer if we could create a third function, which takes two functions, and return their composition:

type Increment = (x: number) => number
const increment: Increment = (x) => x + 1
type Stringify = (x: number) => string
const stringify: Stringify = (x) => x.toString()
type Compose = (
f: (x: number) => string,
g: (x: number) => number
) => (x: number) => string
const compose: Compose = (f, g) => x => f(g(x))
const incrementAndStringify = compose(stringify, increment)
console.log(incrementAndStringify(33)) // "34"

Adding Generic Types

It would be even nicer, if we could define our compose function so that it’s not limited to the types string and number. Check this out:

type Increment = (x: number) => number
const increment: Increment = (x) => x + 1
type Stringify = (x: number) => string
const stringify: Stringify = (x) => x.toString()
type IncrementAndStringify = (x: number) => string
type Compose = <T, U>(
f: (x: T) => U,
g: (x: T) => T
) => (x: T) => U
const compose: Compose = (f, g) => x => f(g(x))
const incrementAndStringify: IncrementAndStringify = compose(stringify, increment)
console.log(incrementAndStringify(41)) // "42"

In the code above we are using two generics that allow us to replace T and U by any types. That way we can compose any two functions with different type signatures. In the way we defined the compose function above, we have only two constraints:

  • The type of input of g, f, and our compose function is the same.
  • The type of output of f and our compose function is the same.

Using function composition allows us to reuse a lot of small functions by composing them in different ways, to achieve different results. Testing each of these functions is easy.

A Generic compose Function

We could take it a step further, and define a super generic compose function, that could take any two functions, no matter their signature:

type Compose = <A, B, C>(
f: (x: B) => C,
g: (x: A) => B
) => (x: A) => C
const compose: Compose = (f, g) => x => f(g(x))
const incrementAndStringify: IncrementAndStringify = compose(stringify, increment)
console.log(incrementAndStringify(41)) // "42"

Here, we define a generic compose function compose with three generic types:

  • A: The type of input to g (the first function in the composition), and to the compose function itself.
  • B: The type of input to f, and the output from g.
  • C: The type of output from f, and the output of compose (the final result).