Posts by code blue(6)

Page 1 of 2
BakaArts

Functional programming in TypeScript

Part 1 - Introduction and Function Composition

Functional programming is a programming paradigm, which allows us to write our programs in a declarative and composable way by combining functions.

Functional programming in TypeScript?

Functional programming is language agnostic, meaning that we can apply it using almost any language. The only requirement is that the language treats functions as first-class citizens, which means that we can:

  • Assign functions to variables.
  • Pass functions as arguments to other functions.
  • Use functions as return values from other functions.

All of the above is doable in TypeScript, which makes it a suitable choice to write code in the FP paradigm.

NOTE

Pure functional programming is a somehow more strict paradigm, and the exact difference between pure and impure functional programming is a matter of controversy. In fact, the earliest programming languages cited as being functional, IPL and Lisp, are both impure functional languages. Some examples of pure functional languages are Haskell and PureScript.

There are several libraries such as ramda or fp-ts, that include features to allow us to write in a more pure functional style. In this series of articles, we won’t be using any of these, just vanilla TS.

But what is Functional Programming about?

FP is about taking some input, and process it by using a chain of transformations (each transformations is accomplished by a function). When each of these functions is called with some given arguments, it will always return the same result (pure function).

In constrast, an impure function, like the ones we use in imperative programming, can have side effects (such as modifying the program’s state or taking input from a user). Side effects are considered undesirable in pure functional programming because they make functions less predictable and harder to test.

NOTE

But at some point, our application will have to interact with the outside world (get user input), how does FP deal with that? FP relegates dealing with side effects to a thin layer outside our application.

Some defining features of FP are:

  • Functions are at the center of the paradigm. We end up with a bunch of reusable units of code, which leads to having to write less code to achive the same results.
  • These functions are quite deterministic, meaning, given a given input, they always return the same output, regardless of the program’s state.
  • Easy to test code: As a result, when writing tests for the functions, we don’t have to worry about program’s state.
  • Easier to debug: FP aims to minimize or isolate side effects to make code more predictable, testable, and easier to debug.
  • We’ll see that for or while loops are not used in FP; in these scenarios we use recursion.

As with any other approach, it will take time to become comfortable using it. As a result, noticing its benefits will take some time.

Pure Functions

A pure function has the following characteristics:

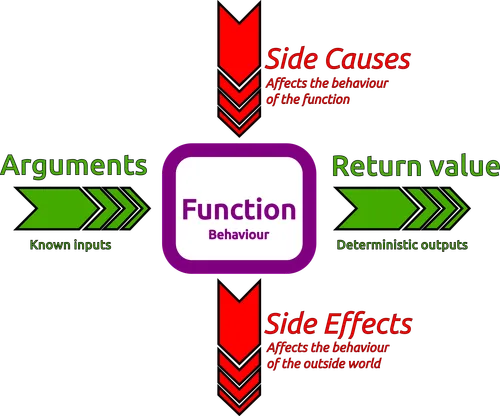
  • It’s deterministic, meaning that given the same input (given in the arguments), the function always returns the same output. That implies that the function shouldn’t be affected by the state of the program (no side causes), only by its input.
  • A pure function has no side effects, meaning that calling such a function should not mutate the state of the program.
Pipe analogy

In FP, we don’t use variables only constants. Each transformation (function call) returns a new value, which is assigned to a constant. This constant can be used as input (argument) in the next transformation.

Total vs Partial Functions

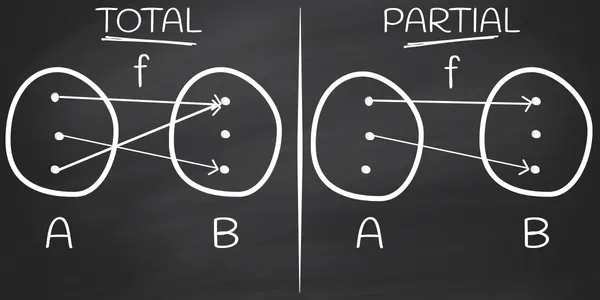
A total function is a function that is defined for all possible inputs in its domain. This means that for every input value in the domain, the function will produce a valid output. For example:

function add(a: number, b: number): number {
return a + b
}

A partial function is a function that is defined for only a subset of inputs in its domain. For some inputs, the function may not produce a valid output or may result in an error. For example:

function divide(a: number, b: number): number {
if (b === 0) {
throw new Error('Division by zero is not allowed')
}
return a / b
}

So the main difference is that total functions map all of its inputs to some output value, whereas partial functions map only a subset of its inputs to some output:

Total vs partial functions

IMPORTANT

Deterministic also means that a given input value can be mapped to one and only one output value. If an input value could result in one of several output values, that’s not very deterministic, ain’t it?

Key Differences Between Total and Partial Functions

AspectTotal FunctionPartial Function
DefinitionDefined for all inputs in its domain.Defined for only a subset of inputs.
BehaviorAlways produces a valid output.May fail or throw errors for some inputs.
Input ValidationNo input validation is needed.Input validation is often required.

Why Total Functions Are Preferred in Functional Programming

  1. Predictability: Total functions are easier to reason about because they are guaranteed to work for all inputs.

  2. No Runtime Errors: Total functions eliminate the risk of runtime errors caused by invalid inputs.

  3. Composability: Total functions can be composed more easily because they always produce valid outputs, which can be passed as inputs to other functions.

  4. Immutability: Total functions align with the principles of functional programming, where functions are deterministic and side-effect-free.

How to Handle Partial Functions in FP

In functional programming, partial functions are often avoided or handled explicitly using techniques like:

  1. Option Types (e.g., Maybe or Option): Wrap the result in a type that explicitly represents the possibility of failure. For example:
function safeDivide(a: number, b: number): number | null {
return b === 0 ? null : a / b
}
  1. Validation: Validate inputs before calling the function to ensure they are within the valid subset.
function divide(a: number, b: number): number {
if (b === 0) {
throw new Error('Division by zero is not allowed')
}
return a / b
}

Function Composition

Most of what we do in FP is composing functions, which consists in combining two or more functions to produce a new function; The output of one function becomes the input of the next one. Function composition allows us to build complex operations by combining smaller, reusable functions.

For example, imagine we have the function increment:

type Increment = (x: number) => number
const increment = (x: number): number => x + 1

And also the function stringify:

type Stringify = (x: number) => string
const stringify: Stringify = (x) => x.toString()

Using function composition we can define a higher-order function named incrementAndStringify, where we connect the output tof increment to the input of stringify:

type IncrementAndStringify = (x: number) => string
const incrementAndStringify: IncrementAndStringify = (x) => stringify(increment(x))
const result: string = incrementAndStringify(1)
console.log(result) // "2"

NOTE

Function composition is closely related to the property of referential transparency. A piece of code is referentially transparent if you can replace a function call with its result without changing the behavior of the program. For example:

const stringify = (x: number): string => x.toString()
const add = (a: number, b: number): number => a + b
const result = stringify(add(2, 3))
const result2 = stringify(5) // We can replace add(2, 3) with 5

A Step Up

In the previous section, we were composing functions by hardcoding their names into the composed version. It would be nicer if we could create a third function, which takes two functions, and return their composition:

type Increment = (x: number) => number
const increment: Increment = (x) => x + 1
type Stringify = (x: number) => string
const stringify: Stringify = (x) => x.toString()
type Compose = (
f: (x: number) => string,
g: (x: number) => number
) => (x: number) => string
const compose: Compose = (f, g) => x => f(g(x))
const incrementAndStringify = compose(stringify, increment)
console.log(incrementAndStringify(33)) // "34"

Adding Generic Types

It would be even nicer, if we could define our compose function so that it’s not limited to the types string and number. Check this out:

type Increment = (x: number) => number
const increment: Increment = (x) => x + 1
type Stringify = (x: number) => string
const stringify: Stringify = (x) => x.toString()
type IncrementAndStringify = (x: number) => string
type Compose = <T, U>(
f: (x: T) => U,
g: (x: T) => T
) => (x: T) => U
const compose: Compose = (f, g) => x => f(g(x))
const incrementAndStringify: IncrementAndStringify = compose(stringify, increment)
console.log(incrementAndStringify(41)) // "42"

In the code above we are using two generics that allow us to replace T and U by any types. That way we can compose any two functions with different type signatures. In the way we defined the compose function above, we have only two constraints:

  • The type of input of g, f, and our compose function is the same.
  • The type of output of f and our compose function is the same.

Using function composition allows us to reuse a lot of small functions by composing them in different ways, to achieve different results. Testing each of these functions is easy.

A Generic compose Function

We could take it a step further, and define a super generic compose function, that could take any two functions, no matter their signature:

type Compose = <A, B, C>(
f: (x: B) => C,
g: (x: A) => B
) => (x: A) => C
const compose: Compose = (f, g) => x => f(g(x))
const incrementAndStringify: IncrementAndStringify = compose(stringify, increment)
console.log(incrementAndStringify(41)) // "42"

Here, we define a generic compose function compose with three generic types:

  • A: The type of input to g (the first function in the composition), and to the compose function itself.
  • B: The type of input to f, and the output from g.
  • C: The type of output from f, and the output of compose (the final result).
The Ethertales

Functional programming in TypeScript

Part 2 - Currying

In mathematics and computer science currying is the technique of translating a function that takes multiple arguments into a sequence of families of functions, each taking a single argument.

The Pipe Analogy

One constraint of FP is that functions should only receive one input, which are technically known as unary functions. We can think of a function as a pipe that takes in one input and produces one output. This is similar to how a water pipe takes in water and produces a flow of water out the other end.

Pipe analogy

But what if we need to write a function that takes in multiple input values? We could pass all of the inputs as properties of a single object and call it a day. For example:

const greet = ({name: string, greeting: string}) => {
return `${greeting}, ${name}!`;
};
greet({name: 'John', greeting: 'Good morning'}); // => Good morning, John!

This is a perfectly valid approach, but it does introduce some potential issues that can make functions less predictable and harder to optimize in a purely functional paradigm:

  • We introduce potential mutation risks if the object is modified elsewhere in the program.
  • We’re requiring the caller to know the exact property names. If the function expects { name: string, greeting: string } but receives { name: 'Alice' }, it could break at runtime.

Curried Functions: Building a Pipeline

The FP approach to deal with this is to create an outer function that receives a single input, wrapping an inner function (also unary). For example, let’s rewrite the previous example in a curried way:

function greet(greeting: string) {
return function(name: string) {
return `${greeting}, ${name}!`
}
}
const result = greet('Hello')('Bob')
console.log(result) // => Hello, Bob!

Note that greet is a function that returns another function. The first function takes in a single input, greeting, and returns another function that takes in a single input, name. The inner function then produces the final output. For example:

console.log(greet('Hello'))

We’re calling the only the outer function greet, this is the output:

function (name) {
return `${greeting}, ${name}!`;
}

Where’s the pipeline?

Let’s rewrite the previous example in a more functional style:

const greet = (greeting: string) => (name: string) => `${greeting}, ${name}!`;

Using arrow functions this resembles a series of pipes that take in one of the inputs and pass the output to the next pipe, creating a sort of pipeline.

Pipeline analogy

This is similar to how a water pipe can be connected to multiple other pipes, each taking in one input and producing one output. Let’s create another simple example:

type Sum = (a: number) => (b: number) => number;
const sum: Sum = (a) => (b) => a + b;
const result = sum(1)(2);
console.log(result); // => 3

You may be wondering, how this is useful? Well, imagine we want to write a function that increments a number by a certain value. We could write a function reusing our sum function:

type Increment = (value: number) => number;
const increment: Increment = (value: number) => sum(value)(1);
const result = increment(5);
console.log(result); // => 6

What about decrementing?

type Decrement = (value: number) => number;
const decrement: Decrement = (value: number) => sum(value)(-1);
const result = decrement(5);
console.log(result); // => 4

Currying Functions

Now imagine that we have a function that takes in multiple inputs, and we want to curry it so we can use it as a curried function:

// Just an usual binary function
const normalSum = (a: number, b: number) => a + b
type Curry2 = (f: (a: number, b: number) => number)
=> (a: number)
=> (b: number)
=> number
const curry2: Curry2 = f => a => b => f(a, b)
const curriedSum = curry2(normalSum)
const partialResult = curriedSum(1)
console.log(partialResult) // b => f(a, b)
const finalResult = partialResult(41)
console.log(finalResult) // 42

In the code above:

  • normalSum is a normal function that takes in two inputs.
  • curry2 is a function that takes in a function f and returns a curried version of it.
  • curriedSum is the curried version of normalSum.
  • partialResult is the result of calling curriedSum with the first input, which returns a function that takes in the second input.
  • finalResult is the result of calling partialResult with the second input, which produces the final output.

So what’s the point of currying?

  1. It allows us to create partial functions that can be reused in different contexts ().
  2. It allows us to write multi-argument functions, which is easier to reason, then turn them into their curried versions.
  3. We can use the partial functions to create other versions of the same function, like increment and decrement in the previous example.
  4. Some libraries that include multi-argument functions can be curried, and the resulting functions can be used in a more functional way.

Developers often write regular functions first and curry them later if needed. Many libraries, like Lodash, provide a _.curry function so you don’t have to manually curry everything.

A Generic Curry Function

Let’s rewrite curry2 as a generic curry function that can curry any function, regardless of the type of their arguments. Here’s an example:

type Curry2 = <T, U, V>(f: (a: A, b: B) => C)
=> (a: A)
=> (b: B)
=> C

This is a generic function that takes in a function f that takes in two arguments of type A and B, and returns a value of type C. The curried version of the function takes in the first argument of type A, and returns a function that takes in the second argument of type B, and returns a value of type C. Let’s see how this works in practice:

const normalSum = (a: number, b: number) => a + b
type Curry2 = <TA, B, C>(f: (a: A, b: B) => C)
=> (a: A)
=> (b: B)
=> C
const curry2: Curry2 = f => a => b => f(a, b)
const curriedSum = curry2(normalSum)
const partialResult = curriedSum(1)
console.log(partialResult) // b => f(a, b)
const finalResult = partialResult(41)
console.log(finalResult) // 42

This works exactly the same as before, but now we can use it with any function that takes in two arguments of any type. For example:

const normalConcat = (a: string, b: string) => a + b
const curriedConcat = curry2(normalConcat)
const partialResult = curriedConcat('Hello')
console.log(partialResult) // b => f(a, b)
const finalResult = partialResult('World')
console.log(finalResult) // HelloWorld
Cool image

React with Deno

How to start a React project in Deno!

So you’ve been hearing about a lot of good things about Deno, want to try it out but don’t know where to start? Don’t worry, got you covered son! How about we set up a React project using the Jurassic runtime and Vite.js? This guide will also show you how to install Deno.

NOTE

Deno is a simple, modern, and secure runtime for JavaScript and TypeScript that uses V8 and is built in Rust. It’s a great alternative to Node.js, and promises to be more secure and faster.

Installing Deno

The Deno installation in macOS/Linux, is very simple, you just need to run the following command:

Terminal window
curl -fsSL https://deno.land/install.sh | sh

TIP

In macOS, you can also install Deno using Homebrew, just run brew install deno. Or using your package manager in Linux.

For Windows, you can use PowerShell:

Terminal window
irm https://deno.land/install.ps1 | iex

WARNING

For the time you’re reading this, the installation process may have changed. Please refer to the official Deno installation guide for the most up-to-date instructions.

Starting a new React project

To start a new React project using Deno, we’ll use Vite.js, a build tool that aims to provide a faster and leaner development experience for modern web projects. To create a new React project, run the following command:

Terminal window
deno run -RWE npm:create-vite-extra@latest

The npm: prefix is used to indicate that the create-vite-extra script (that will help you create a new Vite project with extra templates and options) should be fetched from the npm registry. This allows Deno to run npm packages directly without needing a separate package manager like npm or yarn.

NOTE

The -RWE flags in the deno run command are used to grant specific permissions to the script being executed. Here’s what each flag stands for:

  • -R (short for --allow-read) grants the script permission to read files and directories.
  • -W (short for --allow-write) grants the script permission to write to files and directories.
  • -E (short for --allow-env) grants the script permission to access environment variables.

Remember when we mentioned that Deno is more secure? This is one example.

This command will start a prompt asking you for the project name, template, and other options. Choose the React template and follow the instructions. When it finishes, you’ll see the following message:

Scaffolding project in /home/bob/react-deno...
Done. Now run:
cd react-deno
deno task dev

That’s it, not much to be done. Just go to the project folder and run deno task dev to start the development server. You can now start coding your new React project using Deno!

Installing packages

In the previous section we’ve seen how to create a new React project using Vite.js. Now, let’s see how to install new packages in your project. For example, let’s install React Router, a popular routing library for React:

Terminal window
deno add npm:react-router@latest

TIP

Read our other post about React Router 7 to learn more about how to use it.

Formatting Code

Deno includes a built-in code formatter called deno fmt that can be used to format your code. To format all the files in your project, run the following command:

Terminal window
deno fmt

But running a command each time you want to format your code can be cumbersome. To make it easier, we’ll make it so that when we use a shortcut, our code is automatically formatted (it can be also be configured on save).

Installing the Deno VSCode Extension

We just have to open the Extensions panel in VSCode, and search for the Deno extension.

Initialize Workspace Configuration

Once the Deno extension has been installed, you can initialize the workspace configuration by running the Deno: Init command from the command palette (Cmd+Shift+P on macOS, Ctrl+Shift+P on Windows/Linux).

Deno Init

A file called .vscode/settings.json will be created in your workspace with the following configuration:

{
"deno.enable": true,
}

That enables Deno in your workspace. Now, to configure the code formatting, we can add the following to the file above:

"[typescript]": {
"editor.defaultFormatter": "denoland.vscode-deno"
},
"[javascript]": {
"editor.defaultFormatter": "denoland.vscode-deno"
}

TIP

Optionally, if you want to format the code on save, add the following:

"editor.formatOnSave": true

Also, we can configure the formatting style in the deno.json file:

"fmt": {
"options": {
"useTabs": false,
"lineWidth": 80,
"indentWidth": 2,
"singleQuote": true,
"proseWrap": "always",
"semiColons": false
}
}

WARNING

Be careful with the formatting settings, if you are used to the ones used by Prettier, you may have to adjust them; e.g. "semi": false doesn’t work in Deno.

The future

uv - Blazingly Fast 😏 🚀

A Python's Package and Project Manager written in Rust

uv is an extremely fast package and project manager for Python, written in Rust. I hear you mumbling, another package manager for Python? Bro, this time is different, hear me out, uv really is the future. In this post we’ll spend some minutes learning how to use it.

What can I do with it?

Lots of things, but from the top of my head:

Installation

There are plenty of ways to get this puppy up and running in our machine. The first one, if you’re lucky enough to be on Linux or macOS:

Terminal window
$ curl -LsSf https://astral.sh/uv/install.sh | sh

After the installation, we have to restart our shell (just type exit in your terminal). That’s because the installer added uv to our PATH.

NOTE

If you’re in Windows 🤢:

Terminal window
powershell -ExecutionPolicy ByPass -c "irm https://astral.sh/uv/install.ps1 | iex"

For Christ’s sake, you can even install it with pip!

Terminal window
pip install uv

Anyways, once you’ve installed it, and as a sanity test, run:

Terminal window
$ uv
An extremely fast Python package manager.
Usage: uv [OPTIONS] <COMMAND>

TIP

Check the docs for uninstallation if you need to.

Installing Python Versions

uv can also install and manage Python versions:

Terminal window
$ uv python install

That would get us the latest version, but if you want to install a specific one, just say it:

Terminal window
$ uv python install 3.12

NOTE

If you run the command above (regardless if you’re in a project folder), it will install Python in ~/.local/share/uv/python/cpython-3.13.3-macos-aar, and create a symlink to it in ~/.local/bin/python3.13.

To see a list of the available and installed Python versions:

Terminal window
$ uv python list

IMPORTANT

We don’t need to install Python to get started; If Python is already installed on your system, uv will detect and use it.

Projects

uv supports managing Python projects, which define their dependencies in a pyproject.toml file. Like in other languages, we can create a new Python project using the uv init command:

Terminal window
uv init my-proj

That will create the following project structure within the my-proj folder:

my-proj/
.
├── .python-version
├── README.md
├── main.py
└── pyproject.toml

TIP

If you already have a project folder, let’s say you already have the my-proj folder, you can run just uv init within the folder.

The main.py file contains a simple “Hello world” program. Try it out with uv run:

Terminal window
$ cd my-proj
$ uv run main.py
Using CPython 3.13.2 interpreter at: /usr/bin/python3.13
Creating virtual environment at: .venv
Hello from my-proj!

Now, if we list the content of our project:

Terminal window
$ ls -a
.
├── .git
├── .gitignore
├── .venv
│   ├── bin
│   ├── lib
│   └── pyvenv.cfg
├── .python-version
├── README.md
├── main.py
├── pyproject.toml
└── uv.lock

That’s right, uv has created a virtual environment (in .venv folder), and initialized a git repo for us. From a project point of view, the pyproject.toml contains our project’s metadata (sort of the package.json in Node.js):

[project]
name = "hello-world"
version = "0.1.0"
description = "Add your description here"
readme = "README.md"
dependencies = []

Managing Dependencies

Managing dependencies is easy. Let’s say we want to install marimo:

uv add marimo

Marimo includes a tutorial, so let’s run it, to verify it’s installed:

uv run marimo tutorial intro

WARNING

If you try to run:

marimo tutorial
zsh: command not found: marimo

Your shell will complain! That’s because when we run uv add marimo, uv installs marimo into a virtual environment (under the .venv folder). This environment is isolated, meaning the marimo executable is only available when the virtual environment is activated or when you explicitly use uv run to access it.

I hope that was enough to get you started; feel free to check the official docs, they’re awesome.