Content collections are the best way to manage content in any Astro project. Using the Content layer API we can define a collection to provide automatic TypeScript type-safety for all of our content.
Let’s say we want to build our personal blog using Astro; using a collection we can turn a bunch of Markdown files (or MDX, Markdoc, YAML, or JSON files) stored locally in our project as the source of our blog content.
NOTE
This API allows us to load local content (aka files in our filesystem), but there are also third-party loaders (our create our own custom loader) to fetch the content from remote sources (think headless CMS).
To define a collection, we must create a src/content.config.ts file in your project, which Astro will use to configure your content collections (we can define many collections).
This file used to go in src/content/config.ts (the old location, Astro API moves fast), but apparently, now it has to be placed in src/content.config.ts. The glob function allows us to do two things:
Set the folder for our collection, using base (relative to project root).
Exclude some folder/files from being parsed, using the pattern option (!_**/*.md won’t match folders starting with un underscore)
NOTE
We are using TypeScript file (*.ts) to configure our collection, but it’s also possible to use JavaScript (with the .js extension) to define our collection; or even a Michael Jackson file (.mjs).
In computer science, a set is an abstract data type that can store distinct values, without any particular order. In this article we’ll take a look at how to implement this basic data structure using generics and a bit of concurrency.
Before generics were a thing in Go, people used maps to create custom sets when needed:
existingTitles :=map[string]bool{}
existingTitles["Getting Started with Go"] =true
existingTitles["Understanding Goroutines"] =true
existingTitles["Getting Started with Go"] =true
if existingTitles["Getting Started with Go"] {
fmt.Println("Title already exists.")
}
The type of the value isn’t important, since we only care about the keys. Using bool is convenient because it lets us check for membership directly in a conditional:
if validCategories[category] {
// whatevs...
}
When you access a map with a key that doesn’t exist, Go returns the zero value for the map’s value type, i.e. false. That way the condition evaluates to false whenever category isn’t in the set.
TIP
If memory usage is a concern, you can use an empty struct as the map value type:
existingTitles :=map[string]struct{}{}
Note that I’ve also initialized the map with {}. Without it, the declaration is invalid. If that’s too many braces for you, use:
existingTitles :=make(map[string]struct{})
And if you’re only declaring the variable, you could instead write:
var existingTitles map[string]struct{}
Using struct{} for set values is the idiomatic approach in Go because it occupies zero bytes.
This pattern works well and is widely used in Go, but it’s really just using a map to simulate a set. Before generics, you’d need a separate set implementation for every element type — one for strings, one for ints, and so on. With generics, we write it once and let the type parameter do the rest.
The general syntax for a generic type declaration in Go is:
typeTypeName[TConstraint] UnderlyingType
Where:
TypeName is the name of the generic type.
T is the type parameter (a placeholder for a concrete type).
Constraint specifies which types T is allowed to be.
UnderlyingType is the actual type definition that uses T.
Our generic Set will take a single type parameter, E, which represents the type of elements stored in the set:
typeSet[Ecomparable] map[E]struct{}
Let’s break it down:
E is the type parameter. You can think of it as a placeholder for the actual element type, such as string, int, or User.
comparable is the type constraint: It restricts E to types that can be compared with == and !=.
NOTE
Go maps use equality operators to determine whether a key already exists. When you look up a key or insert one, the map compares it with existing keys. Because of this, map keys must be comparable.
Constraint specifies which types T is allowed to be.
The type parameter can be used in the function’s parameters, return type, or both.
Since we can’t use a map until it’s initialised, let’s provide a constructor function, which will be generic as well:
funcNewSet[Ecomparable]() Set[E] {
returnSet[E]{}
}
When we call this function, we need to specify the concrete element type. For example, to create a Set of strings:
names :=NewSet[string]()
Note that a generic set is not a complete type until we instantiate it with a concrete type. Each instantiation gives us a different set type; we write the set implementation once, but each set still keeps its own element type.
Now let’s write a generic method to add values to the set. We’ll make it variadic, so that it can add one or more elements at a time:
func (s Set[E]) Add(values...E) {
for _, v :=range values {
s[v] =struct{}{}
}
}
Since our set is backed by a map, adding an element means assigning that value as a key. The map value is struct{}{} because we don’t need to store any extra data; the presence of the key is enough. For example:
Making Add variadic gives us a more flexible API. We can still add a single element, but we can also add multiple elements in one call:
Printing the set reveals its underlying map representation, which isn’t ideal if we simply want to inspect its contents. Let’s add a method that returns all the elements in the set as a slice. Because sets are inherently unordered, the order of the elements is undefined.
func (s Set[E]) Members() []E {
result :=make([]E, 0, len(s))
for v :=range s {
result =append(result, v)
}
return result
}
Let’s take a look now:
names :=NewSet[string]()
names.Add("Alice")
names.Add("Bob")
names.Add("Frankie")
fmt.Println(names.Members()) // [Alice Bob Charlie]
WARNING
The order of the elements is not guaranteed and may vary between runs!
Let’s also implement the String method so that our set prints more nicely:
func (s Set[E]) String() string {
return fmt.Sprintf("%v", s.Members())
}
With this method in place, we no longer need to call Members explicitly when printing a set:
fmt.Println(s) // [2 3 1]
You may notice that the elements appear in a different order each time you run the program, and that’s perfectly fine. By definition, a set is an unordered collection of distinct values. Since our implementation is backed by a map, it naturally inherits the map’s lack of ordering guarantees.
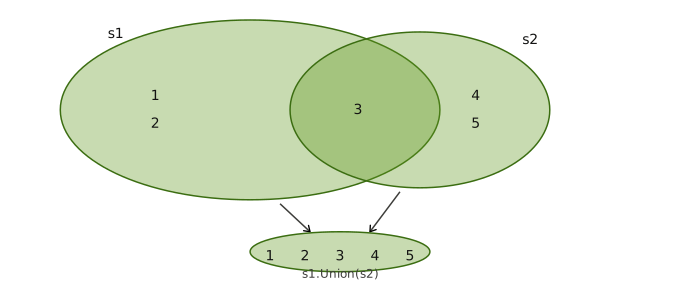
A common operation on sets is the union of two sets: a new set containing all the elements that appear in either set.
One way to implement this is to create a new set containing the members of the first set, and then add the members of the second set:
func (s Set[E]) Union(s2Set[E]) Set[E] {
result :=NewSet(s.Members()...)
result.Add(s2.Members()...)
return result
}
As you can see, we’re making use of our existing API to implement the Union:
NewSet to create the new set.
Add variadic to merge the second set without the need of a loop.
Let’s try it with two small sets of integers:
s1 :=NewSet(1, 2, 3)
s2 :=NewSet(3, 4, 5)
fmt.Println(s1.Union(s2)) // [1 2 3 4 5]
The resulting set contains every element from both sets, but only once. Even though both s1 and s2 contain 3, it appears only once in the union because sets cannot contain duplicate elements.
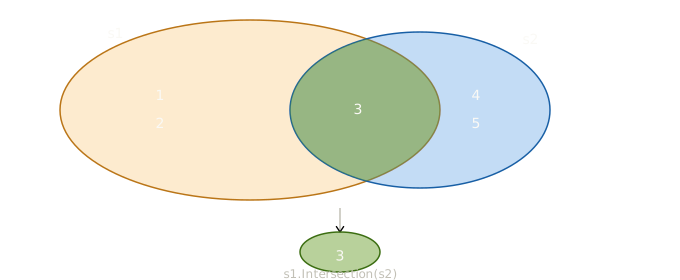
Let’s also implement intersection. The intersection of two sets is a new set containing only the elements that both sets have in common.
Unlike Union, we can’t simply combine the members of both sets. Instead, we need to examine each element of one set and check whether it also exists in the other:
func (s Set[E]) Intersection(s2Set[E]) Set[E] {
result :=NewSet[E]()
for _, v :=range s.Members() {
if s2.Contains(v) {
result.Add(v)
}
}
return result
}
In other words, we iterate over the members of s, and whenever an element is also present in s2, we add it to the result. Let’s try it:
s1 :=NewSet(1, 2, 3)
s2 :=NewSet(3, 4, 5)
fmt.Println(s1.Intersection(s2)) // [3]
As expected, the only element shared by both sets is 3, so the intersection contains just that value.
Maps in Go are not safe for concurrent use. If multiple goroutines read from and write to the same map simultaneously, the program will panic. To make our Set concurrency-safe, we can embed a sync.RWMutex and lock appropriately on every operation.
A sync.RWMutex distinguishes between reads and writes:
Any number of goroutines can hold a read lock simultaneously.
— Write locks are exclusive: when a writer holds it, no readers or other writers can proceed.
This makes it a good fit for a set, where reads (like Contains) are frequent and writes (like Add) are less so.
IMPORTANT
We’ll store a pointer to the mutex rather than the mutex value itself. If we stored it by value, copying the Set would copy the mutex too — and two independent mutexes no longer protect the same data. Since it never makes sense to copy a mutex, defining the mutex field as a pointer prevents this from happening accidentally.
Before generics, duplicating data structures across types made sophistication impractical — nobody wants to maintain N versions of the same complex code. So corners got cut. Generics remove that disincentive, making it worthwhile to build data structures that are actually good.
The constructor looks much the same as before, with two additions: it initializes the
mutex with &sync.RWMutex{} and the underlying map explicitly, then returns a pointer
to the Set struct rather than the struct itself — consistent with storing the mutex by
pointer.
The behaviour of Add is the same as before, with one important difference: it must
acquire a write lock before touching the map. This prevents any other goroutine from
reading or writing while the update is in progress.
func (s *Set[E]) Add(vals...E) {
s.mutex.Lock()
defer s.mutex.Unlock()
for _, v :=range vals {
s.data[v] =struct{}{}
}
}
defer s.mutex.Unlock() ensures the lock is always released when Add returns,
even if something panics mid-loop.
Members doesn’t modify the map, so a write lock would be overkill. A read lock is
enough — it allows other goroutines to read concurrently, while still blocking any
writer that tries to modify the map at the same time.
To verify that our is concurrently safe, we need to exercise the Set concurrently — at least one goroutine writing, another reading, and enough repetitions that a data race has a fair chance to surface. A single read and write might get lucky; a thousand of each is harder to fluke.
s :=NewSet(1, 2, 3)
var wg sync.WaitGroup
wg.Add(1)
gofunc() {
for i :=0; i <1000; i++ {
s.Add(i)
}
wg.Done()
}()
for i :=0; i <1000; i++ {
_ = s.Members()
}
wg.Wait()
fmt.Println("Huzzah!") // Huzzah!
If the locking is correct, our program won’t panic, and we should see the output:
Huzzah!
Let’s see what happens if we comment out the locking code in Add and run the same test:
func (s *Set[E]) Add(vals...E) {
// s.mutex.Lock()
// defer s.mutex.Unlock()
// ...
}
If you run the program, you’d most probably see something like this:
fatal error: concurrent map iteration and map write
goroutine 1 [running]:
...
The Go runtime detected a concurrent read in Members and a write in Add, and since
it can no longer guarantee the integrity of the data, it terminates the program
immediately.
We could implement Intersection the same way as before — reusing Members,
Contains, and Add — and it would be concurrency-safe without any extra work, since
those methods already handle their own locking.
But there’s an efficiency concern. Since we call s2.Contains — which locks and
unlocks the mutex — for every member of s, large sets will produce a lot of mutex
churn. Mutexes are fast, but they aren’t free, and repeatedly acquiring and releasing a
lock in a tight loop adds up.
A better approach is to lock s2 once, do all the membership checks while the lock is
held, then release it:
func (s *Set[E]) Intersection(s2*Set[E]) *Set[E] {
result :=NewSet[E]()
s2.mutex.RLock()
defer s2.mutex.RUnlock()
for _, v :=range s.Members() {
if _, ok := s2.data[v]; ok {
result.Add(v)
}
}
return result
}
One read lock on s2 for the entire operation, rather than one per element.
NOTE
It’s a trade-off, though. Holding a read lock on s2 for the entire operation avoids
mutex churn, but it also means blocking any writer that wants to modify s2 for the
full duration of the intersection. For large sets, that could be a long time.
Depending on the application, more granular locking — acquiring and releasing the lock
for each individual Contains check — might actually be preferable. Less contention
per operation, at the cost of more locking overhead overall. It just depends on whether your bottleneck is mutex churn or lock contention.
Not every application needs concurrency safety. If your set is only ever accessed from a single goroutine, the mutex overhead is pure waste. In that case, we can go back to the simpler implementation from the start of this article — same methods, no locking.
Rather than maintaining two entirely separate types, we can offer both through two constructors:
NewSet for the concurrency safe default.
NewUnsafeSet for when performance matters more than safety.
Users get the right tool for the job, and we only write the implementation once.
UnsafeSet.Add is the same as before — iterate and assign. Set.Add wraps it with a write lock, ensuring no other goroutine can read or write the underlying map while the update is in progress:
UnsafeSet.Members is the same implementation we wrote earlier: create a slice,
iterate over the map keys, and append each element. Set.Members adds a read lock
around that same logic:
func (s UnsafeSet[E]) Members() []E {
result :=make([]E, 0, len(s))
for v :=range s {
result =append(result, v)
}
return result
}
func (s *Set[E]) Members() []E {
s.mutex.RLock()
defer s.mutex.RUnlock()
return s.data.Members()
}
Since Members only reads from the map, the safe version uses RLock instead of
Lock.
UnsafeSet.Union creates a new unsafe set, copies the members of the first set, and
then adds the members of the second set. Set.Union does the same through safe
snapshots of both sets:
func (s UnsafeSet[E]) Union(s2UnsafeSet[E]) UnsafeSet[E] {
result :=NewUnsafeSet(s.Members()...)
result.Add(s2.Members()...)
return result
}
func (s *Set[E]) Union(s2*Set[E]) *Set[E] {
result :=NewSet(s.Members()...)
result.Add(s2.Members()...)
return result
}
The safe version uses Members on both sets, so each read is protected by its own
read lock.
UnsafeSet.Intersection creates a new unsafe set and adds only the values that also
exist in the second set. Set.Intersection takes safe snapshots before doing the
same work:
func (s UnsafeSet[E]) Intersection(s2UnsafeSet[E]) UnsafeSet[E] {
result :=NewUnsafeSet[E]()
for _, v :=range s.Members() {
if s2.Contains(v) {
result.Add(v)
}
}
return result
}
func (s *Set[E]) Intersection(s2*Set[E]) *Set[E] {
result :=NewSet[E]()
for _, v :=range s.Members() {
if s2.Contains(v) {
result.Add(v)
}
}
return result
}
The safe version delegates reads through Members and Contains, so each map access is protected by a read lock.
This article is not really about building the perfect set implementation. The set is just a useful example: small enough to understand, but rich enough to show how generics and concurrency fit together in Go.
NOTE
That’s not to say the implementation is complete. There’s plenty more we could add:
An Equals method
An IsSubset method
A Subtract method that removes all members that belong to some other set
A Difference function to find the members that two sets don’t have in common
A Make function to pre-allocate memory
Map, Reduce, and Filter operations on set elements
These are left as an exercise for the reader.
If you need a production-ready set package, two good options are:
Pagefind is a search library for static websites. It works by indexing the built static files of our site, and adding a JavaScript search API that allows the user to find content with code that runs client-side.
The official Pagefind site contains excellent and comprehensive instructions for installing Pagefind
Since we are in Node.js, we can take advantage of the wrapper package for this runtime, and run:
npx pagefind --site "public"
Where public is whatever folder your SSG outputs the generated site, but I’m gonna go ahead and add it to my project dependencies so that I can integrate it in my package.json scripts:
So far we need to use several commands to get Pagefind generating an index of the latest version our our site:
Build the site itself: npm run build
Generating the Pagefind index: pagefind --site dist
It’s probably a good idea to combine these two commands, so that when we deploy our site, whatever pipeline runs the npm run build, will also generate the Pagefind stuff. So let’s update the build script in our package.json file:
"scripts": {
"build":"astro build && pagefind --site dist"
}
Running npm run build now, would produce the usual output, plus the following:
[...]
dist/pagefind
[Building search indexes]
Total:
Indexed 1 language
Indexed 45 pages
Indexed 1285 words
Indexed 0 filters
Indexed 0 sorts
If we open the dist folder (where Astro outputs the build), we should see a pagefind folder with our indexed site.
CAUTION
In my case, that didn’t work due to the way my github workflow was written:
As you can see, it runs the astro command directly, and not our npm run build. So if you don’t want to mess with your pipeline (no biggie, but hey), you can add the following to your build script:
That way, after every build, we end up with the pagefind folder in our public directory, and our GitHub pages deployment won’t have trouble finding it.
Bottom line, you can do it your way, but the whole setup needs the pagefind folder available in public folder.
IMPORTANT
Don’t forget to remove pagefind from your .gitignore file.
Assuming that everytime we build our site, Pagefind indexes its content, we need a UI to search and see the results. Pagefind now recommends the Component UI, which gives us declarative web components for common search interfaces.
NOTE
The previous UI, based on pagefind-ui.js and new PagefindUI(...), still exists in the docs, but the Component UI is the recommended path now.
The nice thing about the new system is that the components follow WAI-ARIA best practices, handle visible and assistive text, and are designed to be hard to misuse.
For images in search results, I provide explicit Pagefind metadata in the page head:
<meta
data-pagefind-meta="image[content]"
content={post.data.coverImage.cropped.src}
/>
<meta
data-pagefind-meta="image_alt[content]"
content={post.data.coverImage.alt}
/>
One thing to keep in mind is that Pagefind indexes the built site. If images look broken while running the dev server, test with the production build instead:
My search results showed the site title instead of the post title. The reason was subtle: Pagefind’s automatic title metadata comes from the first h1 on the page.
My logo used to be an h1:
<h1class="anaglyph">生活のバランス</h1>
So Pagefind treated the logo as the page title. The fix was to make the logo a non-heading element:
<spanclass="anaglyph">生活のバランス</span>
Then I restored the old visual size with CSS:
.anaglyph {
display:inline-block;
font-size:2em;
font-weight:900;
line-height:1.2;
}
Another good option is to explicitly mark the real page title for Pagefind:
One issue I ran into was related to Astro’s client-side navigation. The modal worked the first time, but after clicking a search result and navigating to another page, Cmd+K started behaving erratically.
The browser complained with something like:
Failed to execute 'showModal' on 'HTMLDialogElement':
The element is not in a Document.
The problem was that Astro swapped the page DOM, but Pagefind still had references to the old modal internally. So the next time I opened search, Pagefind sometimes tried to open a modal that was no longer in the document.
The fix was to clean up Pagefind before Astro swaps pages:
<script>
if (!document.documentElement.dataset.pagefindCleanupBound) {
if (!manager?.getInstanceNames ||!manager?.removeInstance) return
for (constnameof manager.getInstanceNames()) {
manager.removeInstance(name)
}
})
}
</script>
That closes any open Pagefind modal and clears Pagefind’s cached component instances before Astro swaps the page. The next page then creates fresh modal and trigger references.
Pagefind should scan the built HTML, find the data-pagefind-body elements, and generate the index. After that, the search trigger should open the modal, Cmd+K / Ctrl+K should work, and the results should show the correct post titles.